Usage
Assembly
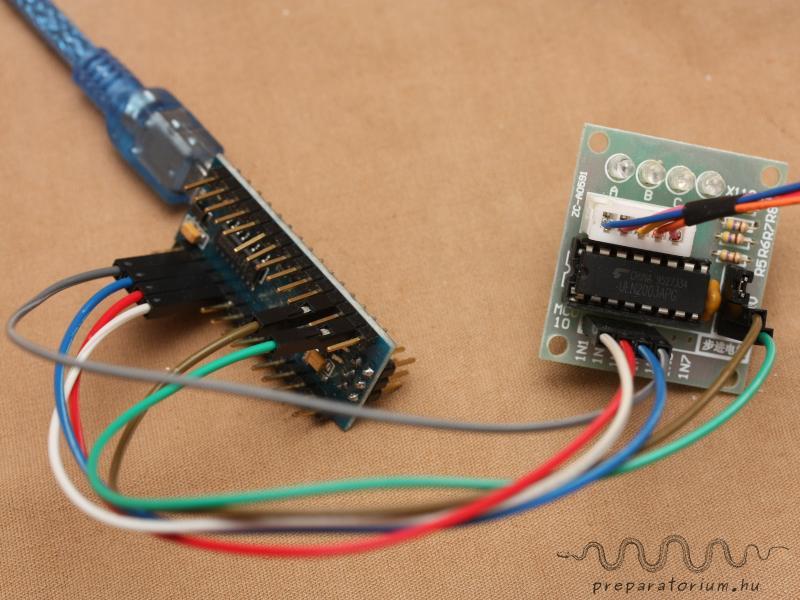
1. Connecting the motor controller with the stepper motor and the Arduino Nano.
The controller and the stepper motor can be easily joined with the help of a plug. Connect the controller and the Arduino pins according to the table below.
Összeszerelés
1. A motor vezérlő összekötése a léptető motorral és az Arduino Nano-val.
A motor vezérlő és a léptető motor egyszerűen összekapcsolható a gyárilag kialakított csatlakozó segítségével. A motor vezérlő és az Arduino összekapcsolása 6 db anya-anya jumper kábellel történik az alábbi táblázat alapján.
| Arduino Nano | Controller |
|---|---|
| 5V | + |
| GND | - |
| D8 | IN1 |
| D9 | IN2 |
| D10 | IN3 |
| D11 | IN4 |

(Connecting the Arduino Nano and the Controller /
Az Arduino Nano és a motor vezérlő összekötése)
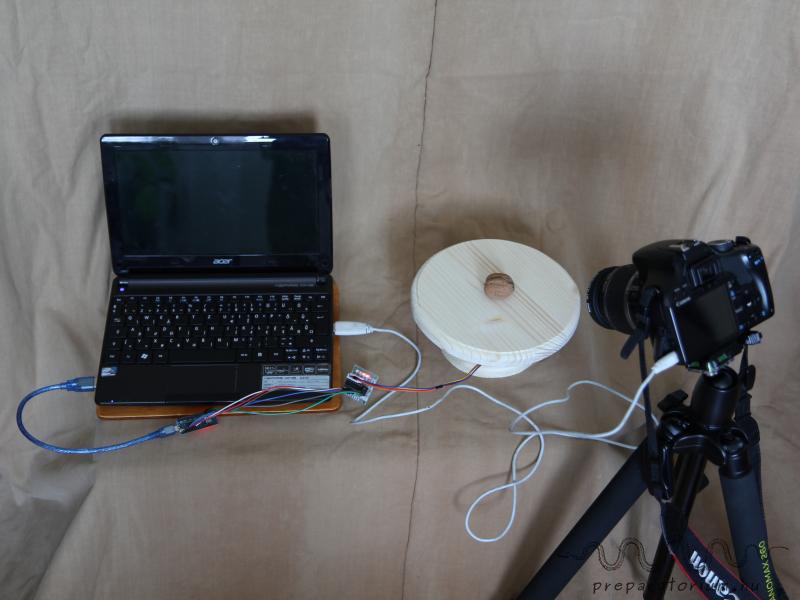
2. Connecting the Arduino Nano to the computer.
Connect the Arduino to the computer with a usb data cable. The Arduino boots in a few seconds and is ready to use.
3. Connecting the camera to the computer.
After setting up the camera (aperture, shutter speed, etc.), connect it to the computer with an USB data cable. In case the operating system mounts the camera, you have to unmount it manually.
2. Az Arduino Nano csatlakoztatása a számítógéphez.
Az Arduinot USB kábellel egyszerűen csatlakoztathatjuk a számítógéphez. Az Arduino néhány másodperc alatt automatikusan "bebootol" és működésre kész.
3. Fényképezőgép csatlakoztatása a számítógéphez.
Állítsuk be a fényképezőgépet (blende, záridő, stb...), majd USB kábellel csatlakoztassuk a számítógéphez. Amennyiben az operációs rendszer automatikusan "bemountolja" a fényképezőgépet, azt "unmountolni" kell.

(The assembled system / Az összeállítás)
Using the Product Photo 360
Launch the program Product Photo 360 with the command $ python productphoto360.py. If the operating system needs administrator privileges to open the serial port use the command $ sudo python productphoto360.py.
If you use the Live CD simply click on the icon ProductPhoto360 in the desktop.
A Product Photo 360 használata
A programot a $ python productphoto360.py paranccsal indíthatjuk el. Elképzelhető, hogy az operációs rendszer adminisztrátori jogosultságot kér a serial port megnyitásához. Ekkor a $ sudo python productphoto360.py parancsot használjuk.
Live CD használata esetén egyszerűen az asztalon lévő ProductPhoto360 ikonra történő kattintással indítjuk a programot.

(Screenshot / Képernyőkép)
Using the program
The program consists of two parts (the Positioning and the Rotating photography frame).
Use the Positioning frame to rotate and set the starting position of the object. It is useful to check whether the object is always in the field of view over the full turn. Set the No. of steps and press the Rotate button (512 steps equals 360 degrees).
Use the frame Rotating photography for the product photography. The Count button does the following: After setting the No. of photos and the No. of steps, the No. of all steps is calculated. If just the No. of photos are added, the Count button gives suggestions for the No. of steps and also for the No. of photos. After you set both the No. of steps and the No. of photos press the Shoot button to start taking photos.
Note: If you add a negative number to No. of photos, during the process the turntable will rotate anticlockwise.
The Preview button is used to make an image preview. The camera takes a photo and the program opens it in a new window after downloading. Double click to open the image in the default image viewer.
With the Abort button you can abort the running process.
After the program finished taking photos quit the program then simply unplug the Arduino. After shutting down the camera unplug the camera cable. During the shooting process the pictures are not downloaded automatically, they are kept in the memory card of the camera.
A program használata
A program két fő részből áll, az egyik a Positioning, a másik pedig a Rotating photography ablak.
A Positioning ablak a tárgy kezdő pozíciójának beállítására szolgál. Hasznos, ha le szeretnénk ellenőrizni, hogy a teljes körbefordulás alatt végig benne van-e a tárgy a fényképezőgép látómezőjében. Add meg, hogy hány lépést tegyen meg a motor, majd kattints a Rotate gombra (512 lépés felel meg 360 °-nak).
A Rotating photography ablakot használd a forgatásos fényképezéshez. A Count gomb megnyomása esetén a számítógép kiszámolja, hogy a fényképezés során összesen hány lépést fog megtenni a motor. Abban az esetben, ha a No. of steps (lépések száma) mezőt üresen hagyjuk, a program javaslatot tesz a lépésszámra, illetve a jobb eredmény érdekében az elkészítendő fényképek számára (No. of photos) is. Amennyiben mind a lépések számát, mind a fényképek számát beállítottuk, kattintsunk a Shoot gombra, ezzel elkezdődik a fényképezés.
Megjegyzés: Amennyiben a készítendő fényképek számának (No. of photos) negatív számot adunk meg, a fényképezés során a tárgy az óramutató járásával ellentétesen fog forogni.
A Preview gombbal előnézeti képet készíthetünk. A fényképezést követően a program letölti, majd új ablakban megnyitja a képet. Ha a képre duplán kattintunk, az megnyílik az alapértelmezett képnézegető programban.
Az Abort gomb megnyomásával a futó folyamatokat szakíthatjuk meg.
Miután végeztünk a fényképezéssel, lépjünk ki a programból, az Arduino kábelét egyszerűen csak húzzuk ki a számítógépből, majd a fényképezőgép kábelét a fényképező kikapcsolása után szintén kihúzhatjuk. A forgatásos fényképezés során készített fényképek a fényképezőgépen maradnak, azokat nem tölti át a program a számítógépre.